Monday, August 14, 2023

Transfer OCI Audit logs to SIEM tooling


Goal

We want to transfer the audit logs from Oracle Cloud Infrastructure (OCI) to the Logz.io SIEM tool.

OCI audits all CRUD operations on objects in the tenancy. All the Create, Update and Delete actions (on any resource) will be captured and sent to the logz.io tool. SELECT (Read) operations are ignored for now.

Unexpectedly, this proved to be harder than the documentation wants you to believe. We did this for "logz.io" as SIEM target, but obviously this can be customized to suit your needs.

Technical flow 

  1. Service Connector “Logfile_audit_archive_connector
    • Searches audit logfiles for any POST, PUT or DELETE action
    • Sends the resulting logfile to a bucket
  2. Bucket “logfile_download_bucket
    • Receives the audit log files
    • Emits an event on creation of a new object
    • Deletes the logfiles after 3 days
  3. Events Service Rule “Process audit file from audit bucket
    • Matches “Object - Create” event for the bucket
    • Calls OCI Function
  4. OCI Function “logzio-from-bucket”
    • Created on application “logzio”
    • Custom function that retrieves the audit file from the bucket, transforms it to a usable format and sends it to logzio

Issues found

Several issues were encountered when designing and testing this concept. Some choices in this setup are a result of having to cerate a workaround.

  • A Service connector directly from Event Logging to a Notification did not work, because the logging from that service did not contain the details of the user modifying the resource.
    • It seems that this service emits a “v1 JSON event”, whereas we need a “v2 JSON event” format (including the modifying user).
  • The Log Search Service Connector puts the logfile in gz format on the bucket
    • The pre-built function “Object Storage File Extractor” to unzip bucket files only operates on zip, not on gz files.
    • We had to write our custom gunzip part in the function.
  • Logs are stored in minimized JSON format (without the brackets for a collection and without commas).
    • These are not stored on a single line per record, but on multiple lines, and having the curly brackets separating two records on the same line. This is a problem.
    • The JSON converter in Python does not understand the OCI format, so you will need to modify it to get it in a format that Python understands.
  • A simple OCI notification to call Logz.IO cannot be used, as the HTTP(s) does not allow the use of the required token on the URL.
  • Logz.IO expects a minimized JSON format (one record per line, no commas, no brackets for a collection).
    • This is only slightly different than what OCI has, but converting between the two proved a challenge.

Technical details – Bucket

To store the (temporary) audit log files, we create a bucket. The compartment for this bucket can be any compartment, but we recommend using a compartment that contains generic or maintenance related resources.

The bucket “logfile_download_bucket” is created as a private bucket in the Standard Storage tier. Important: enable “Emit Object Events” for this bucket.

Optional: Create a lifecycle rule to delete audit logs older than x days.

Technical details – OCI Application

Create an application to hold your function(s):

  1. From the hamburger menu: Developer Services - Functions - Applications
  2. Select “Create application”
    • name = “logzio
    • VCN = “<yourVCN>
    • subnet = “<yourPrivateSubnet>

 Optional: create a separate user to administer the functions:

  • Create the user
    • From the hamburger menu: Identity & security – Identity - users
  • Select “Create User
    • Select “IAM User
    • Name = "logzio_user"
  • Edit the user after creation
    • Edit User Capabilities
      • Select only "auth token"
  • Select “Auth Tokens” from the menu on the left
    • Select “Generate Token
    • Save the generated value for later (it will only be displayed once)
  • Create a group
    • From the hamburger menu: Identity & security – Identity – Groups
  • Select “Create Group
    • Name = “function_admins
  • Select “Add User to Group”
    • Add the user “logzio_user” to the new group
  • Create a policy
    • From the hamburger menu: Identity & security – Identity – Policies
  • Select “Create Policy
    • Name = “Functions_Repo_Policy
    • Compartment = “<root>
    • Policy statements
      • Allow group function_admins to read objectstorage-namespaces in tenancy
      • Allow group function_admins to manage repos in tenancy

Create the function

Your application “logzio” has an entry “Getting Started” in the menu on the left of the application page. Follow these steps with some modifications:

  1. Launch Cloud shell
  2. Use the context for your region
    • fn list context
    • fn use context eu-amsterdam-1
  3. Update the context with the function's compartment ID
    • fn update context oracle.compartment-id <your Compartment OCID>
  4. Provide a unique repository name prefix
    • fn update context registry <region-key>.ocir.io/<tenancy-namespace>/logzio
  5. Generate an auth token
    • Already done with separate user “logzio_user”
    • If you did not create a separate user in the previous steps, generate an Auth Token for your personal user
  6. Login to the registry
    • docker login -u '<tenancy-namepsace>/logzio_user' <region-key>.ocir.io
    • password = Token from earlier step
  7. Verify the setup
    • fn list apps
  8. Generate a 'hello-world' boilerplate function
    • fn init --runtime python logzio-from-bucket
  9. Switch into the generated directory
    • cd logzio-from-bucket

You can now modify the “func.py” and “requirement.txt” files to set up the actual function, or you can continue with the deployment of this template function to test it out.

  1. Deploy your function
    • fn -v deploy --app logzio
  2. Invoke your function
    • fn invoke logzio logzio-from-bucket
Under "Configuration" in the OCI console for this function, you can add key-value pairs. Add one for the bucket:
  • input-bucket = logfile_download_bucket

Technical details – OCI function

Modify the file “requirements.txt”:

fdk>=0.1.59

oci

requests

Modify the file “func.py” (disclaimer: this is PoC code, so use at your own peril 😉)

import io

import json

import logging

import oci

import gzip

import requests


from fdk import response


def handler(ctx, data: io.BytesIO = None):

    input_bucket = ""

    try:

        cfg = ctx.Config()

        input_bucket = cfg["input-bucket"]

        logzio_url   = cfg["logzio-url"]

        logzio_token = cfg["logzio-token"]

    except (Exception) as e:

        logging.getLogger().info('Error getting context details: ' + str(e))

        return response.Response(

            ctx, response_data=json.dumps(

                {"message": "Error getting context details: " + str(e) }),

            headers={"Content-Type": "application/json"}

            )

    try:

        body = json.loads(data.getvalue())

        object_name = body["data"]["resourceName"]

        namespace = body["data"]["additionalDetails"]["namespace"]

    except Exception as e:

        return response.Response(

            ctx, response_data=json.dumps(

                {"message": ": ERROR: During get event details: " + str(e) }),

            headers={"Content-Type": "application/json"}

            )

    signer = oci.auth.signers.get_resource_principals_signer()

    client = oci.object_storage.ObjectStorageClient(config={}, signer=signer)

    try:

        audit_data = client.get_object(namespace, input_bucket, object_name)

        audit_bytesio = io.BytesIO(audit_data.data.content)

        z = gzip.GzipFile(fileobj=audit_bytesio,mode='rb')

        audit_data_text = z.read()

        z.close()

    except Exception as e:

        logging.getLogger().info("ERROR: During load data: " + str(e))

        raise       

    try:

        url_string    = 'https://'+logzio_url+'/?token='+logzio_token+'&type=http-bulk'

        data_string = '[' + audit_data_text.decode('utf-8') + ']'

        data_string = data_string.replace('\n','\n,')

        data_string = data_string.replace('}{','},{')

        json_string = json.loads(data_string)

        logzio_string = ''

        for record in json_string:

            logzio_string += json.dumps(record) + '\n'

    except Exception as e:

        logging.getLogger().info("ERROR: During JSON formatting: " + str(e))

        raise

    try:

        resp = requests.post(url_string, data=logzio_string)

        if resp.status_code != 200:

            logging.getLogger().info(resp.text)

            raise Exception("Unexpected HTTP status code received")

    except Exception as e:

        logging.getLogger().info("ERROR: During LogzIO HTTP call: " + str(e))

        raise

    return response.Response(

        ctx, response_data=json.dumps(

            {"message": "Success"}),

        headers={"Content-Type": "application/json"}

    )

Redeploy the application

Technical details – Service Connector

With the bucket in place, create a Service Connector to place the audit logfiles.

  • From the hamburger menu: Observability & Management – Logging – Service Connectors
  • Select “Create Service Connector”
    • Connector Name = “Logfile_audit_archive_connector”
    • Resource compartment = “<yourCompartment>
    • Source = “Logging
      • Compartment = “<root>
      • Log Group = “_Audit
        • Check “Include _Audit in subcompartments
      • Query code editor = “search "<tenancyOCID>/_Audit_Include_Subcompartment" | (data.request.action='POST' or data.request.action='PUT' or data.request.action='DELETE')
    • Target = “Object Storage”
      • Compartment = “<yourCompartment>
      • Bucket = “logfile_download_bucket
      • Object Name Prefix = “audit
The Service Connector will create a policy for itself to access the right resources.

Technical details – Rule

Last step is to connect the bucket to the function using an Events Service Rule.

  •  From the hamburger menu: Observability & Management – Events Service – Rules
  • Select “Create Rule
    • Display Name = “Process audit file from audit bucket
    • Rule 1
      • Condition = “Event Type
      • Service Name = “Object Storage
      • Event Type = “Object - Create
    • Rule 2
      • Condition = “Attribute
      • Attribute Name = “CompartmentName
      • Attribute Values = “<yourCompartment>
    • Rule 3
      • Condition = “Attribute
      • Attribute Name = “bucketName
      • Attribute Values = “logfile_download_bucket
    • Actions
      • Action Type = “Function
      • Function Compartment = “<yourCompartment>
      • Function Application = “logzio
      • Function = “logzio-from-bucket
After this step, logs should start flowing from Audit logs to your SIEM tooling.

Flow visualization


Thursday, June 15, 2023

RMAN - Validate plus Preview - the optimal combination?

For a long time, we have worked with VALIDATE and PREVIEW in RMAN to check the backups we created for completeness and consistency. There is a problem that neither of these commands covers the full spectrum of what you want to check. Reviewing this way of working, I (finally) improved the automation of these checks.

Basically, when using Preview, it lists all the files it needs to get to the specified point for restore/recover. On the other hand, Validate actually checks if files are available and usable. The drawback of Preview is that you don't check the files to be actually there. The drawback of Validate is that it only checks the files to restore, not any files needed after that to do a recovery. Only by using a combination of the two outputs, you can get a higher degree of confidence that you have all the files necessary and that they are actually usable.

I came across this statement (which can be augmented with a "summary" to shorten the output):

RMAN> RESTORE DATABASE VALIDATE PREVIEW;

It first selects all files needed to restore and recover, and then it checks the files with validate. That means that you don't need two commands and compare the output, but you can just use this single command. That works fine for Level 0 backups, archivelog backups and separate archives (those not yet in backup). Problem is that any Level 1 backups that are listed by Preview, are not actually validated.

Disclaimer: This syntax (validate and preview combined) is not documented like this, but it seems to do the trick. I will (cautiously) use this from now on and see if this holds up in the real world...

Checking the level 1 backups

With the output from the Preview, it is easy to write a script that extracts all the Level 1 backups and generate an RMAN script to validate all backupsets from the Level 1 backups. The output from that check plus the original output gives you a higher level of confidence in your backups. You now know that your Level 0, Level 1, archivelog backups and archivelogs are all present and usable in case of a restore/recover scenario.

Checking recoverability - check your SCNs

When using the "preview" command, somewhere at the end of the preview section output, it will say something like this:

recovery will be done up to SCN  2482924
Media recovery start SCN is      2482924
Recovery must be done beyond SCN 2484433 to clear datafile fuzziness

Here you can see that the "recovery up to SCN" is equal to the "Start SCN", while it should be higher than the "Recovery beyond SCN" to get to a consistent state. That's not good. However, this can easily be cleared by using an UNTIL TIME clause. It will do the same file checks, but the values displayed in the summary change. This makes it easier to (automatically) check if you are getting what you want.

RMAN> RESTORE DATABASE UNTIL TIME "sysdate" VALIDATE PREVIEW SUMMARY;

recovery will be done up to SCN  2641133
Media recovery start SCN is      2482924
Recovery must be done beyond SCN 2484433 to clear datafile fuzziness

Much better. It doesn't change the files it checks, but now the logging is clearer.

The ultimate RMAN check?

You could even add one final touch: check the logical sanity of your files:

RESTORE DATABASE UNTIL TIME "sysdate" VALIDATE CHECK LOGICAL PREVIEW SUMMARY;

Putting it all together - scripting your validation

A rather simple script can be made to give you the validation and some checks. Can probably be done much cleaner and nicer, but I didn't really focus on the scripting syntax yet. You can easily guess the contents of the ".rmn" script used here... 
Some assumptions apply, like that the ORACLE_SID has been set before the script is run. Be aware that some modifications will probably be needed before using this on your own environment.

This version has some basic checks:
  • RMAN error checking
  • SCN validation (check if restore/recover goes beyond the "clear fuzziness" SCN)
  • Level 1 backup validation 
#!/bin/sh
# -----------------------------------------------
# RMAN validate backups
# -----------------------------------------------
. /home/oracle/.bash_profile
export NLS_DATE_FORMAT="dd-mm-yyyy hh24:mi:ss"
export LOGFILE=rman_validate_preview.log
export BASEDIR=$(dirname "$0")
#
cd $BASEDIR
echo $(date +'%d-%m-%Y %H:%M:%S') " - starting backup validate" > $LOGFILE
echo $(date +'%d-%m-%Y %H:%M:%S') " - creating RMAN output files" >> $LOGFILE
#
# Call the rman script and write output to separate file
#
echo $(date +'%d-%m-%Y %H:%M:%S') " - RMAN validate preview" >> $LOGFILE
rman target / @validate_preview.rmn log=validate_preview.log
#
# Check level 1 backups (if any)
# Also check controlfile restore
# (comes in handy when no level 1 backups exist to prevent an empty run block)
#
LEVEL1CMDFILE=validate_level_1.rmn
echo "run {" > $LEVEL1CMDFILE
echo "restore controlfile validate;" >> $LEVEL1CMDFILE
awk '/ B  1 / {print "validate backupset " $1 ";"}' validate_preview.log >> $LEVEL1CMDFILE
echo "}" >> $LEVEL1CMDFILE
#
echo $(date +'%d-%m-%Y %H:%M:%S') " - RMAN validate controlfile and level 1 backups" >> $LOGFILE
rman target / @$LEVEL1CMDFILE log=validate_level_1.log
#
# check the output for errors
#
echo $(date +'%d-%m-%Y %H:%M:%S') " - Check output for errors" >> $LOGFILE
ERROR_COUNT=$(grep RMAN- validate_*.log | wc -l)
if [ $ERROR_COUNT -eq 0 ]
then
  echo "No errors found in validation" >> $LOGFILE
else
  echo "Errors found in validation" >> $LOGFILE
  echo "--------------------------------" >> $LOGFILE
  grep RMAN- validate_*.log         >> $LOGFILE
  echo "--------------------------------" >> $LOGFILE
fi
echo "######################################################" >> $LOGFILE
#
# Check the validate preview for SCN validity
#
echo $(date +'%d-%m-%Y %H:%M:%S') " - Compare SCNs for recovery" >> $LOGFILE
SCN_START=$(awk '/Media recovery start SCN is/ {print $6}' validate_preview.log)
SCN_RECOV=$(awk '/recovery will be done up to SCN/ {print $8}' validate_preview.log)
SCN_FUZZY=$(awk '/Recovery must be done beyond SCN/ {print $7}' validate_preview.log)
echo "Recovery start at SCN $SCN_START and ends at SCN $SCN_RECOV" >> $LOGFILE
if [ $SCN_RECOV -lt $SCN_FUZZY ]
then
  echo "ERROR: Recovery ends at $SCN_RECOV, but should be done beyond $SCN_FUZZY" >> $LOGFILE
else
  echo "Recovery ends at $SCN_RECOV and this is beyond $SCN_FUZZY, as it should be" >> $LOGFILE
fi
echo "######################################################" >> $LOGFILE
#
# Append all output to global logfile
#
echo $(date +'%d-%m-%Y %H:%M:%S') " - Detailed log output" >> $LOGFILE
echo "######################################################" >> $LOGFILE
cat validate_preview.log >> $LOGFILE
echo "######################################################" >> $LOGFILE
cat validate_level_1.log >> $LOGFILE
echo "######################################################" >> $LOGFILE
echo $(date +'%d-%m-%Y %H:%M:%S') " - End of report" >> $LOGFILE

Monday, March 27, 2023

Configure MFA for OCI / IDCS - how to make sure you have a plan B

When you want to configure MFA on oracle Cloud Infrastructure (OCI), using ICDS, there is a good starting point in the OCI documentation. This document contains a warning (prerequisite number 5), but could have been a little more emphasized: 

"If you don’t register this client application and a Sign-On Policy configuration restricts access to everyone, then all users are locked out of the identity domain until you contact Oracle Support."

I recently had myself locked out of OCI and IDCS (and everyone else along with me), and this prerequisite step helped me through it. There were two challenges, though. The document does not tell you how to actually solve the problem of locking yourself out and it doesn't really explain why I locked myself out in the first place. Here, I will focus on the first part: how to solve the problem once you locked yourself out. It is nice to have this Emergency Access, but how do you use it?

Please note: if you skipped "prerequisite 5" (and did not create an OAuth2 application), this blog does not in fact really help. You will probably need Oracle Support in that case...

Prerequisite - Register a Client Application

So, very important step. Can't repeat it enough: if you want to enable MFA on IDCS, make sure this prerequisite is met. As mentioned in the documentation, use this link to Oracle by Example to set up your Emergency Access application. That's what I call it, as that is what it is for me. Should you lock yourself (and everyone else) out of OCI/IDCS, use this setup to get back in.

The Oracle by Example instructions are pretty clear on how to configure and use Postman. Due to some newer versions, some instructions may be a bit outdated, but all in all it works pretty well. Step 1 is done in IDCS and works as described, that is where you configure the Emergency Access application. Note the client ID and secret and store them in a safe location. 

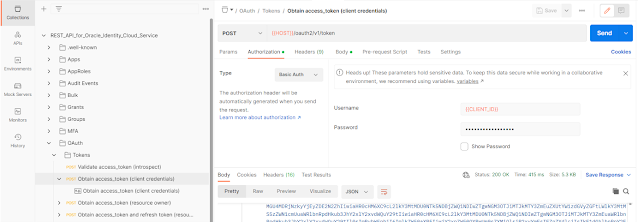
Step 2 and 3 are about getting Postman configured with a (full) Environment and Collection to work with IDCS. Step 4 is all about getting an actual OAuth2 token. Very important, make sure that that part works. In my version of Postman config, I needed to use "On the Collections tab, expand OAuth, then Tokens and select Obtain access_token (client credentials)" and then press "Send" to get the actual token.

Even more important: make sure that with this token, you can access your IDCS environment. I like to do that with "On the Collections tab, expand Users, then Search and select List all users" and after pressing "Send", you should see all your users as a result. If not: don't proceed, but troubleshoot first! Make sure you have the access working, as this might be your last resort at some point.

How does this save you?

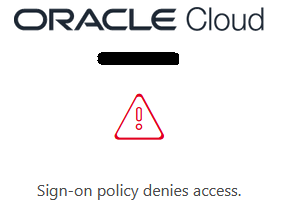
Now we know we can access IDCS, even if our MFA policy would happen to shut us out with the message: "Sign-on policy denies access". If that happens, the steps to solve this are quite easy if you know what to do. First of all: I assume you will have created a separate policy in IDCS for this, and not re-use the default one. As a matter of fact: I highly recommend not messing with the default one.

Even if you are locked out, you can retrieve the list of policies in IDCS with Postman. The value for this policy can be obtained from "Collections tab, expand Policies, then Search and select List all policies". All policies have an id. Find the one for your MFA policy and either note it down somewhere, or better yet: store it in a new custom variable in your Postman Environment. I used "MFA_Policy_id" for this.

With the Policy ID, you can go to "On the Collections tab, expand Policies, then Policy, Modify and choose to duplicate Patch Update a Policy". Rename the duplicate to (for example) "Disable MFA Policy". 

Replace the "{{id}}" in the URI with "{{MFA_Policy_id}}" (or just paste the id itself, if you didn't create a variable).

In the body of this new entry, paste:

{
  "schemas": [
    "urn:ietf:params:scim:api:messages:2.0:PatchOp"
  ],
  "Operations": [
    {
      "op""replace",
      "path""active",
      "value"false    }
  ]
}

Executing this request disables your new policy (literally setting "active" to "false"), allowing you to log in once again. That is why I leave the default policy as it is. It will now be the only one in effect and allows access to verified users.

Now, reconfigure the MFA policy, enable it again and see if it works this time. If not: disable the policy and try again. And remember: as long as you stay signed in to IDCS, you can disable the policy from the console as long as your connections stays valid. And should you get locked out (again), you will always have a plan B!

Friday, October 16, 2020

TYPE becomes INVALID after export/import

A very specific case: at a customer site, we had to refresh a database using expdp/impdp. After the refresh, some TYPEs got INVALID and couldn't be recompiled. The types themselves were not that complex, and not depending on any other objects.

To spoil the surprise, it turns out that the expdp for the database version we were using (12c) messed up the TYPE definition, because it expanded an object name in the definition itself. This in turn was caused by the use of a keyword "ALTER" in the TYPE. Funny thing is: we didn't actually use the keyword as such, but it was used as part of an attribute name.

For example:

CREATE TYPE testuser.test_type_with_keyword
as object
(
   name           varchar2(20),
   alternate_name varchar2(20),
   constructor function test_type_with_keyword
     (self in out nocopy test_type_with_keyword) 
     return self as result
)
not final
/

CREATE TYPE BODY 
testuser.test_type_with_keyword as
  constructor function test_type_with_keyword
    (self in out nocopy test_type_with_keyword)
    return self as result is
  begin
    return;
  end;
end;
/

This snippet contains ALTER as part of the "alternate_name". The export thinks it recognizes a keyword and expands the name in the definition. That way, the name in the TYPE does no longer match the name in the TYPE BODY and recompilation fails.

This can be reproduced using DBMS_METADATA, as that will result in the same name expansion, thus invalidating the TYPE. This is the result after import:

CREATE TYPE testuser.test_type_with_keyword
as object
(
   name           varchar2(20),
   alternate_name varchar2(20),
   constructor function test_type_with_keyword
     (self in out nocopy "TESTUSER"."TEST_TYPE_WITH_KEYWORD"
     return self as result
)
not final

CREATE TYPE BODY testuser.test_type_with_keyword as
  constructor function test_type_with_keyword
    (self in out nocopy test_type_with_keyword)
    return self as result is
  begin
    return;
  end;
end;

Two possible workarounds:
  • prefix the object reference in specification and body yourself
  • don't use the keyword ALTER as part of any TYPE to avoid this expansion (there might be other keywords that are treated the same, but I haven't found any yet)
The good news is: this seems to be a 12c problem, it doesn't reproduce on 18c or 19c.

Complete example:

--
-- Create a normal type first
-- without any keyword, so this will be fine
--

set long 10000

CREATE OR REPLACE TYPE testuser.test_type_without_keyword
as object
(
   name     varchar2(20),
   alt_name varchar2(20),
   constructor function test_type_without_keyword
     (self in out nocopy test_type_without_keyword)
     return self as result
)
not final
/

CREATE OR REPLACE TYPE BODY testuser.test_type_without_keyword as
  constructor function test_type_without_keyword
    (self in out nocopy test_type_without_keyword)
    return self as result is
  begin
    return;
  end;
end;
/

select DBMS_METADATA.GET_DDL('TYPE','TEST_TYPE_WITHOUT_KEYWORD','TESTUSER') from dual;

/*
-- DBMS_METADATA results
CREATE OR REPLACE EDITIONABLE TYPE "TESTUSER"."TEST_TYPE_WITHOUT_KEYWORD"
as object
(
   name     varchar2(20),
   alt_name varchar2(20),
   constructor function test_type_without_keyword
     (self in out nocopy test_type_without_keyword)
     return self as result
)
not final
CREATE OR REPLACE EDITIONABLE TYPE BODY "TESTUSER"."TEST_TYPE_WITHOUT_KEYWORD" as
  constructor function test_type_without_keyword
    (self in out nocopy test_type_without_keyword)
    return self as result is
  begin
    return;
  end;
end;
*/

DROP TYPE 
testuser.test_type_without_keyword;

--
-- Test with the same type, 
-- but then with the ALTER keyword hidden in the code
--

CREATE OR REPLACE TYPE 
testuser.test_type_with_keyword
as object
(
   name           varchar2(20),
   alternate_name varchar2(20),
   constructor function test_type_with_keyword
     (self in out nocopy test_type_with_keyword)
     return self as result
)
not final
/

CREATE OR REPLACE TYPE BODY 
testuser.test_type_with_keyword as
  constructor function test_type_with_keyword
    (self in out nocopy test_type_with_keyword)
    return self as result is
  begin
    return;
  end;
end;
/

select DBMS_METADATA.GET_DDL('TYPE','TEST_TYPE_WITH_KEYWORD','TESTUSER') from dual;               

/*
-- DBMS_METADATA results
CREATE OR REPLACE EDITIONABLE TYPE 
"TESTUSER"."TEST_TYPE_WITH_KEYWORD"
as object
(
   name           varchar2(20),
   alternate_name varchar2(20),
   constructor function test_type_with_keyword
     (self in out nocopy "TESTUSER"."TEST_TYPE_WITH_KEYWORD" )
     return self as result
)
not final
CREATE OR REPLACE EDITIONABLE TYPE BODY
"TESTUSER"."TEST_TYPE_WITH_KEYWORD" as
  constructor function test_type_with_keyword
    (self in out nocopy test_type_with_keyword)
    return self as result is
  begin
    return;
  end;
end;
*/

DROP TYPE testuser.test_type_with_keyword;

Tuesday, January 22, 2019

Downloading files from an Oracle Directory on Amazon RDS

On Amazon RDS, you can upload dumpfiles with a Perl script as described in This Amazon RDS document (see pages 24/25). This works after a little rewrite for some linebreaks and syntax inconsistencies. The script enables you to upload and subsequently import your dumpfile using dbms_datapump on your Amazon RDS Oracle database.

But what if you want to create a datapump export and download the resulting dumpfile(s)? So far I have not found a working example that fits my needs, so I decided to create a new script. As I have no real Perl experience, it will most probably not be an award winning script, but it does the job.

# INPUT parameters:
# 1 – the full name of the RDS server
# 2 - the filename to be downloaded from RDS
# 3 – the password for the DBA user
use strict;
use DBI qw(:sql_types);
use DBD::Oracle qw(:ora_types);
# turn off screen buffering (for displaying progress)
$|++;
# RDS instance info
my $RDS_PORT=1521;
my $RDS_HOST=$ARGV[0];
my $RDS_LOGIN_USER="dba_user";
my $RDS_LOGIN_PW=$ARGV[2];
my $RDS_SID="ORCL";
my $dirname = "DATA_PUMP_DIR";
# Timing variable - start time
my $sttime = time;
my $loopcount = 0;
my $totalcount = 0;
my $totalsize = 0;
# Rest of the variables
my $fname = $ARGV[1];
my $data;
my $chunk = 32767; #max READ size
my $sql_open = "BEGIN perl_global.fh := utl_file.fopen(:dirname, :fname, 'rb', :chunk); END;";
my $sql_read = "BEGIN utl_file.get_raw(perl_global.fh, :data, NULL); EXCEPTION WHEN NO_DATA_FOUND THEN :datalength := 0; WHEN OTHERS THEN RAISE; END;";
my $sql_close = "BEGIN utl_file.fclose(perl_global.fh); END;";
my $sql_global = "create or replace package perl_global as fh utl_file.file_type; end;";
my $conn = DBI->connect('dbi:Oracle:host='.$RDS_HOST.';sid='.$RDS_SID.';port='.$RDS_PORT, $RDS_LOGIN_USER, $RDS_LOGIN_PW) || die ( $DBI::errstr . "\n") ;
my $updated=$conn->do($sql_global);
my $stmt = $conn->prepare ($sql_open);
# Processing the file
$stmt->bind_param_inout(":dirname", \$dirname, 12);
$stmt->bind_param_inout(":fname", \$fname, 12);
$stmt->bind_param_inout(":chunk", \$chunk, 4);
$stmt->execute() || die ( $DBI::errstr . "\n");
open (INF, '>', $fname) || die "\nCan't open $fname for writing: $!\n";
binmode(INF);
$stmt = $conn->prepare ($sql_read);
my %attrib = ('ora_type','24');
my $datalength=1;
print "\nTransferring file: \n";
while ($datalength > 0) {
  $stmt->bind_param_inout(":data", \$data , $chunk, \%attrib);
  $stmt->bind_param_inout(":datalength", \$datalength , 4);
  $stmt->execute() || die ( $DBI::errstr . "\n");
  if ($datalength > 0) {
    print INF $data;
    $loopcount++;
    $totalcount++;
    # refresh display after 320 chunks of 32k bytes = 10 Mb
    if ($loopcount == 320) {
      $totalsize = $totalcount*32/1024;
      print "\r# $totalsize Mb written";
      $loopcount = 0;
    };
  };
};
# Wrap up
$totalsize = $totalcount*32/1024;
print "\r# $totalsize Mb written (done)\n";
close INF || die "Can't close $fname: $!\n";
$stmt = $conn->prepare ($sql_close);
$stmt->execute() || die ( $DBI::errstr . "\n");
#
my $entime = time;
my $elapse = $entime - $sttime;
print "\nElapsed time : $elapse seconds\n\n";


The database/instance name, the DBA database user and port are hardcoded in the script, and I added some parameters. This was sufficient for my situation, and can of course be modified as needed. Just modify the section "RDS Instance Info" or add additional parameters.

I added some "features", like a progress tracker that updates every 10 Mb downloaded content. Not really necessary, but for larger files I like to know what he is doing and far along the download is. All in all this enables me to directly download the dumpfiles (and other files of course) without having to use the dbms_file_transfer (to get it to another database) or the limited "SELECT text FROM table(rdsadmin.rds_file_util.read_text_file('DIR','file.txt'))" for reading text files.

Now, just call it from the commandline, for example:
perl /home/oracle/scripts/download_from_RDS.pl rds_server_name filename

Saturday, September 17, 2016

Resolve ORA-01996 (password file full) without losing your password file entries

As I was playing around with one of my 12c databases, I ran into the ORA-01996 error "GRANT failed: password file '/<>/orapwORCL' is full". The documentation and various other sources are clear about this: you will have to re-create the password file and add all existing entries manually afterwards.

Just when I was about to create a new password file and re-create the entries in there, it occurred to me that 12c has a new feature: the input_file parameter for orapwd. As far as the documentation is concerned, this is to migrate older versions of the password file to 12c.

But, what if we can use this to "migrate" our current 12c password file to a new 12c password file? What if we backup this file and use that as an input for our new password file? I created a quick test setup and found out that this seems to be exactly what I needed. I re-created the password file using the input_file parameter and I could add new entries, but at the same time I kept all the entries that were already there.

The testcase

First of all, I created a new passwordfile with entries=1. Actually, this will hold up to 4 entries for me, because of the fact that it is rounded up to the number of entries per block (in the same documentation I mentioned above).

[oracle@DBServer1 ~]$ cd $ORACLE_HOME/dbs
[oracle@DBServer1 dbs]$ orapwd file=orapwORCL entries=1 force=y
Enter password for SYS:


Using SQL*Plus, I verified that all I had was 1 entry:

SQL> select * from v$pwfile_users order by username, con_id;

USERNAME                       SYSDB SYSOP SYSAS SYSBA SYSDG SYSKM     CON_ID
------------------------------ ----- ----- ----- ----- ----- ----- ----------
SYS                            TRUE  TRUE  FALSE FALSE FALSE FALSE          0


So, now we can start adding users to the passwordfile, until it is full:

SQL> grant sysdba to c##erik container=all;
Grant succeeded.

SQL> grant sysdg to sysdg;
Grant succeeded.

SQL> grant sysbackup to sysbackup;
grant sysbackup to sysbackup
*
ERROR at line 1:
ORA-01996: GRANT failed: password file
'/u01/app/oracle/product/12.1.0/dbhome_1/dbs/orapwORCL' is full


What do we have in the v$pwfile_users at this point?

SQL> select * from v$pwfile_users order by username, con_id;

USERNAME                       SYSDB SYSOP SYSAS SYSBA SYSDG SYSKM     CON_ID
------------------------------ ----- ----- ----- ----- ----- ----- ----------
C##ERIK                        TRUE  FALSE FALSE FALSE FALSE FALSE          0
SYS                            TRUE  TRUE  FALSE FALSE FALSE FALSE          0
SYSDG                          FALSE FALSE FALSE FALSE TRUE  FALSE          0
SYSDG                          FALSE FALSE FALSE FALSE TRUE  FALSE          1

Now, we will go back to $ORACLE_HOME/dbs and re-create the password file, using the input_file parameter. Make sure you backup the current password file, as you can never be too careful...

[oracle@DBServer1 dbs]$ cp orapwORCL orapwORCL_backup
[oracle@DBServer1 dbs]$ orapwd file=orapwORCL entries=10 input_file=orapwORCL_backup force=y


Immediately after that, check the contents of the password file with SQL*Plus:

SQL> select * from v$pwfile_users order by username, con_id;

USERNAME                       SYSDB SYSOP SYSAS SYSBA SYSDG SYSKM     CON_ID
------------------------------ ----- ----- ----- ----- ----- ----- ----------
C##ERIK                        TRUE  FALSE FALSE FALSE FALSE FALSE          0
SYS                            TRUE  TRUE  FALSE FALSE FALSE FALSE          0
SYSDG                          FALSE FALSE FALSE FALSE TRUE  FALSE          0
SYSDG                          FALSE FALSE FALSE FALSE TRUE  FALSE          1

And all entries are still there! Just one last step to prove we have successfully re-created the password file with more entries than we had:

SQL> grant sysbackup to sysbackup;
Grant succeeded.

SQL> select * from v$pwfile_users order by username, con_id;

USERNAME                       SYSDB SYSOP SYSAS SYSBA SYSDG SYSKM     CON_ID
------------------------------ ----- ----- ----- ----- ----- ----- ----------
C##ERIK                        TRUE  FALSE FALSE FALSE FALSE FALSE          0
SYS                            TRUE  TRUE  FALSE FALSE FALSE FALSE          0
SYSBACKUP                      FALSE FALSE FALSE TRUE  FALSE FALSE          0
SYSBACKUP                      FALSE FALSE FALSE TRUE  FALSE FALSE          1
SYSDG                          FALSE FALSE FALSE FALSE TRUE  FALSE          0
SYSDG                          FALSE FALSE FALSE FALSE TRUE  FALSE          1

And I didn't even have to reconnect to or restart the database :-)


Edited: Thanks to Pom for pointing out a small but essential typo

Thursday, December 17, 2015

TNS-12154 on Database Link When Connected Through Listener

I ran into a problem when creating a database link that uses a new TNS entry. The database link seemed to work fine when I created it, but the developers complained about getting TNS-12154 errors when they tried to use it. Checked it again on my side, and the database link worked just fine.
 
After some discussion with the development team, we noticed that the database did work when I connected locally from the database server, but it threw the TNS-12154 when connecting through the listener. So I focussed on why the listener prevented the database link from recognizing my newly created TNS entry. Turns out it has a lot to do with setting a TNS_ADMIN environment variable, the dynamic registration to the listener and the way the listener uses environment variables.
 
So, to paint a picture of the situation:
·        We have a database on Linux (probably any Linux or UNIX variant will have this problem)
·        We have set the TNS_ADMIN environment variable
·        The listener uses both static and dynamic service registration (because we are using OEM)
 
Solutions proposed so far
 
This problem is described in a lot of places, but I could not find a satisfactory solution until recently. The answers I found so far are not satisfactory, some more so than others. They include:
·        Restart the database. When creating a new TNS entry, this will not been seen by the dynamic service registration to the listener. Restarting the database somehow resets this and then the database link also “magically” works.
o   My problem with this: Restarting a (Production) database is not something I want to do when I just want to add a new TNS entry for a database link.
·        Use a different naming method when creating the database link. Instead of the USING clause with a TNS entry, you can specify an EZConnect string or the full description of the TNS entry. Both imply that server and database specific information is to be used in the database link itself.
o   But: I use the tnsnames.ora to have a central location for all descriptions and use that to point to any database/service I need. I don’t want to repeat sevrer/instance information in every database link I create.
·        Set the ENVS clause of the static registration (SID_LIST_LISTENER) to include TNS_ADMIN.
o   This has several drawbacks: You need to use static registration and static registration only. Dynamic takes precedence over Static, and Dynamic cannot be used to set TNS_ADMIN. Even when you decide to use only Static, then you have to maintain the TNS_ADMIN in the environment variable itself and in the listener.ora which means extra maintenance.
·        Don’t use TNS_ADMIN. When not using TNS_ADMIN, all works fine. As the database and the listener will then both use the default location ($ORACLE_HOME/network/admin), they can always find the tnsnames.ora and will pick up new entries right away.
o   The problem is obvious: we use TNS_ADMIN to create a centralized location for our tnsnames.ora file. Not using the TNS_ADMIN would defeat this initial setup.
 
My solution
 
The last “solution”, however, opens up a final solution. When the listener (the dynamic service registration) fails to pick up (or refresh, or whatever you like to call it) changes to tnsnames.ora in the TNS_ADMIN location, it will look at the default location. Creating an OS link there will allow the listener to find the file anyway and use the new TNS entry without having to restart the database. And yes, there is a drawback to this solution as well: you need to create this link in every RDBMS home you created and point it to the TNS_ADMIN location. I think this is still slightly better than not using TNS_ADMIN at all, because we will still have a centralized tnsnames.ora file, and only use links to that file in the RDBMS home directory.
 
Technical “proof”
 
The example sketched below is from an AIX machine, using an 11gR2 database. I also tested this on a 12c database on Linux. Both have the exact same results when it comes to recognizing the new TNS entry.
 
Using the original setup, I modified the tnsnames.ora file in the TNS_ADMIN location:
 
dbserver::../home/oracle:> cd $TNS_ADMIN
dbserver::../oracle/tns:> ls -l
total 16
-rw-r--r--    1 oracle   dba             483 Dec 16 16:37 listener.ora
-rw-r--r--    1 oracle   dba            1581 Dec 16 16:14 tnsnames.ora
dbserver::../oracle/tns:> vi tnsnames.ora
 
I added an “orcldb_self_ref.world” entry, pointing toward my original database. After this, without restarting the database or reloading the listener, I created the database link.
 
dbserver::../oracle/tns:> sqlplus system@orcldb
 
SQL*Plus: Release 11.2.0.2.0 Production on Thu Dec 17 09:41:34 2015
Copyright (c) 1982, 2010, Oracle.  All rights reserved.
Enter password:
Connected to:
Oracle Database 11g Enterprise Edition Release 11.2.0.2.0 - 64bit Production
With the Partitioning, OLAP, Data Mining and Real Application Testing options
 
SQL> create database link dblink_test_erik using 'orcldb_self_ref.world';
 
Database link created.
 
SQL> select * from dual@dblink_test_erik;
select * from dual@dblink_test_erik
                   *
ERROR at line 1:
ORA-12154: TNS:could not resolve the connect identifier specified
 
And there you have it, the TNS-12154. Normally, you would think that we did something wrong defining the TNS entry or something like that. However, when not connecting through the listener, the same database link does work:
 
dbserver::../oracle/tns:> sqlplus system
 
SQL*Plus: Release 11.2.0.2.0 Production on Thu Dec 17 09:41:34 2015
Copyright (c) 1982, 2010, Oracle.  All rights reserved.
Enter password:
Connected to:
Oracle Database 11g Enterprise Edition Release 11.2.0.2.0 - 64bit Production
With the Partitioning, OLAP, Data Mining and Real Application Testing options
 
SQL> select * from dual@dblink_test_erik;
 
D
-
X
 
So, on to the next part, creating an OS link:
 
dbserver::../home/oracle:> cd $ORACLE_HOME/network/admin
dbserver::../network/admin:> ln -s $TNS_ADMIN/tnsnames.ora ./tnsnames.ora
dbserver::../network/admin:> ls -l
total 8
drwxr-xr-x  2 oracle dba 256 Oct 23 09:49 samples
-rw-r--r--  1 oracle dba 187 May 07 2007  shrept.lst
lrwxrwxrwx  1 oracle dba  28 Dec 17 09:45 tnsnames.ora -> /u01/oracle/tns/tnsnames.ora
 
Directly after creating the link, our database link works as it should. Just to prove it works right away, I dropped and re-created it.
 
dbserver::../oracle/tns:> sqlplus system@orcldb
 
SQL*Plus: Release 11.2.0.2.0 Production on Thu Dec 17 09:49:10 2015
Copyright (c) 1982, 2010, Oracle.  All rights reserved.
Enter password:
Connected to:
Oracle Database 11g Enterprise Edition Release 11.2.0.2.0 - 64bit Production
With the Partitioning, OLAP, Data Mining and Real Application Testing options
 
SQL> drop database link dblink_test_erik;
 
Database link dropped.
 
SQL> create database link dblink_test_erik using 'orcldb_self_ref.world';
 
Database link created.
 
SQL> select * from dual@dblink_test_erik;
 
D
-
X
 
Note that when you are already connected, it might be necessary to re-connect to pick up the changes. But that beats restarting the entire database...
 
Final remarks
 
Though this is my preferred solution, it doesn’t mean that it is the only solution. If any of the other options suits your needs better, then by all means: use them ;-)
 
This solution uses an existing setup with TNS_ADMIN set and dynamic service registrations. Both good things in my opinion. Then, by creating a simple link, you can make sure that any changes to your TNS entries are useable right away, instead of having to configure other files or restarting the database.